Hacking MiBand 3 for real, Part 1 - First steps
published in hacking
As promised, in this post we are going to start tearing down the official firmware. We will briefly see what’s in on our arsenal and start disassembling the image. It will be a bumpy ride from the beginning but fear not!
Tools of trade
While there might be some people that can distinguish instructions within a raw binary stream (or hex editor) – I’m not one of them. Why even bother when you can assign mnemonics to every CPU instruction creating your own flavor of assembly language… And if you use a commonly used “flavor” then you can benefit from all the great tools out there, so you don’t have to reinvent the wheel yet again!
The only decompiler that I was aware of (and had the opportunity to tinker with in the past) was IDA Freeware from Hex-Rays. Unfortunately, it’s useless in our case as the free version does not support ARM and I can’t afford the full version.
I’ve started hunting for another great alternative for this job, and after evaluating most of the options and getting tired with objdump I’ve met Ghidra. It’s a really powerful beast, it supports ARM Cortex architecture out-of-the-box, allows you to write Jython scripts, and… it’s open-source! Damn, it’s so much feature-loaded that I can even withstand the fact that it’s using Java!
There is a subtle difference between a decompiler and a disassembler – the level of generated code. A disassembler (e.g. objdump) take an executable file and outputs the code in given flavor of assembly language. Decompilers go way further as they focus on producing a high-level source code, e.g. in C.
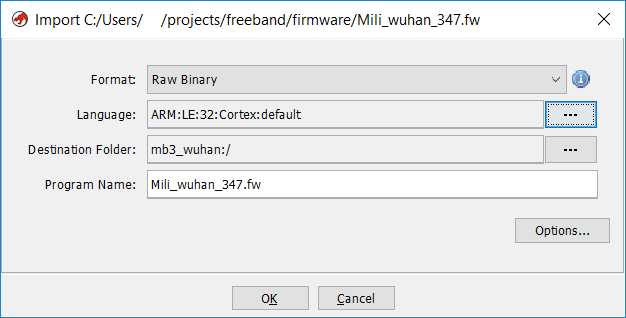
So the first thing that I’ve asked my new dragon friend to do was to create a new empty project and import the Mili_wuhan.fw file into it. In the Language field we search for “Cortex” and we are left with two options: big and little endian. Fun fact: ARM can be configured to run both, so basically I’ve played some trial-n-error game (so you don’t have to) and only the little-endian worked out.
Endianess defines how the value’s bytes are laid out in memory. The most widespread is little-endian which stores the Least Significant Byte first, so the order seems to be reversed compared to common sense. On the other hand we have big-endian (used in PowerPC architectures, e.g. PS3) which stores the Most Significant Byte first. I like to think this way: imagine that we are modifying (e.g. incrementing) one of the “edge bytes” – if the value has changed by a huge amount then you modified the MSB, otherwise it was LSB. There’s also a really great image that illustrates this in a funny way.
Before we smash that “OK” button, let’s quickly check out what hides behind the “Options…” button. And there is our first roadblock: what “Base Address” should we specify there?!
Figuring out the base address
One tempting option would be to leave the default one: 0x00000000 as this is the address which Cortex-M0 uses during startup and moreover our firmware image seems to start with an IVT. Even the Dialog’s datasheet clearly states that it will start from this address, so what’s the problem?
Well, its remappable memory… At system startup this will point to “BootROM”, but during wakeup it could be either “DataRAM” or NVM.
At this moment we can make a safe assumption that there is a hardcoded first-stage bootloader that bootstraps the firmware image. It is something similar to legacy “BIOS” bootloaders (that were located in MBR). In theory it makes a lot of sense: if you flash a non-bootable image or the flash process has failed, such a bootloader could enter a recovery mode allowing you to reflash the device. So I’ve kept skimming through the specs… And in section “3.4.3 BootROM sequence” there’s a great diagram that illustrates this process.
There are two paths and I bet all my money on the NVM BOOTING one, but how to prove I’m right?
It all depends on the “Product Ready” flag (located inside the OTP header at 0x07F8E9D0), but we haven’t dumped the memory yet. Luckily enough the description of this flag provides a hint: 0xAA will be used when OTP or FLASH is programmed.
So pretending that this is the case, and we want to boot from QSPI flash, the bootstrapper checks if qQ magic word is present and then loads the IVT to “DataRAM” (located at 0x07FC0000).
The last step in the boot sequence remaps this memory address to 0x00000000 (so that the IVT is located at the expected place) and finally issues the “Reset” interrupt.
If you’ve got lost, don’t worry – you should have seen the look of my face 😅 While code execution from “DataRAM” is possible, it does not make that much sense as you will have less RAM for runtime data.
Nevertheless, I’ve tried using it as the base address. I can only wish that at this point I should have noticed that the stack pointer would overlap the loaded image…
In summary, this was a dead end as the Reset handler pointed in the middle of nowhere. So as I was kinda out of options I’ve just used the QSPI FLASH’s address 0x08000000 as the base.
It was way better than the previous attempt so I left it until I’ll get a better alternative.
Strings are for humans
If you’ve read my previous post carefully, then you should remember that we used strings to check whether the firmware image is obfuscated somehow. This time we will focus on their content.
The first half of strings output is basically noise which we can safely ignore. The first interesting one is Sleep, and here are a few other interesting ones:
wear_enable
gesture_enable
alg_heartrate_init
Statistics
Sedentary
Sport
alg_init
[%u] In %s: enable=%d mode_type=%d mode_mask=%d
ad_spi_write
[%u] In %s total size=%d slot=%d startAt=%d
store_sport_start
store_sport_end
00000005-0000-3512-2118-0009af100700
00000006-0000-3512-2118-0009af100700
9FBF120D-6301-42D9-8C58-25E699A21DBD
com.facebook.Messenger
ph.telegra.Telegraph
com.skype.tomskype
com.vk.vkclient
com.nianticlabs.pokemongo
com.google.hangouts
Updated
Actualizado
Aktualisiert
Diperbarui
Zaktualizowano
Aggiornato
Atualizado
A atualizar
No se pudo actualizar
 jour impossible
Update fehlgeschlagen
Aktualizacja nieudana
Aggiorn. non riuscito
Kon niet bijwerken
ncellenemedi
Updating fonts
Actualizando fuentes
 jour des polices
Schriftarten updaten
Aktualizowanie czcionki
A atualizar tipos de letra
Lettertype bijwerken
Updating resources
Recursos de actualizaci
 jour des ressources
Aktualizowanie zasob
The second part of above’s list is filled with various translations of the same message. This is great! Why? Because we can backtrack where those strings are used. If we display the “Updating” message then probably the code that does the update must be nearby. So let’s try to figure out how those strings are being used!
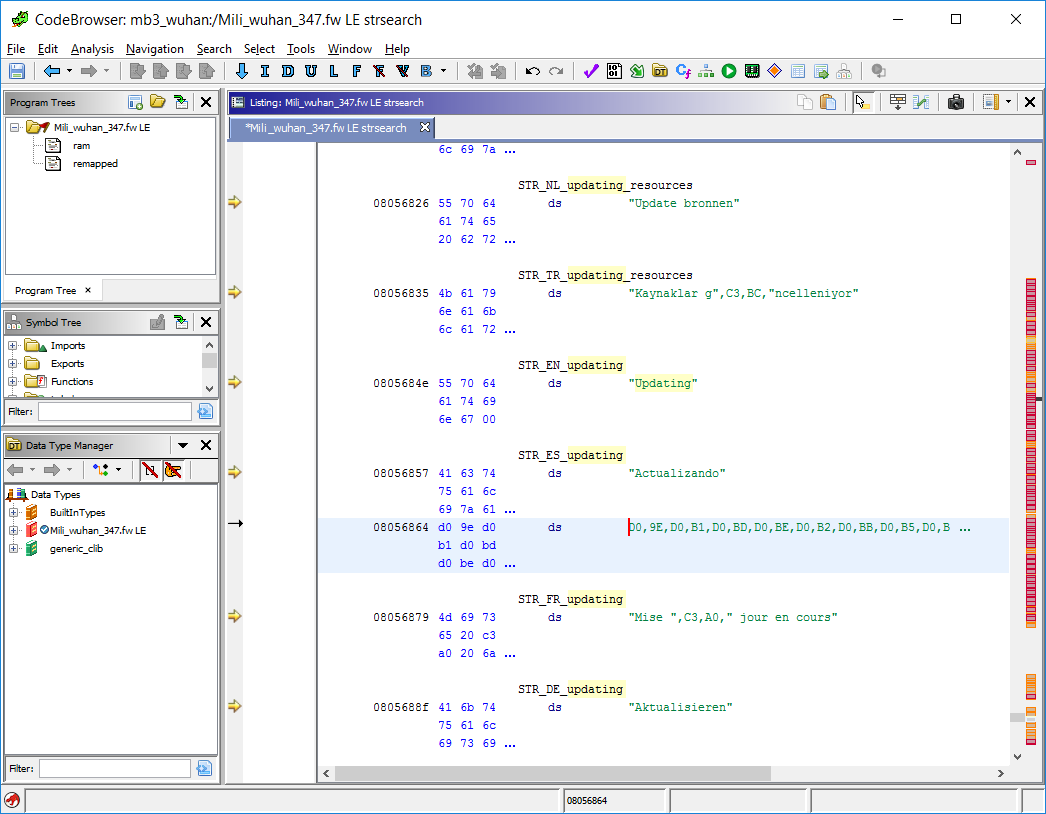
As you can see in the screenshot above, I’ve already labeled some of the strings. It was pretty easy as Google Translate helped me to recognize all the languages, and even guessed what characters I’ve skipped. Just look at the Turkish string for Updating resources – if Google is right then this 0xC3, 0xBC sequence should encode ü.
Well, my intuition was actually right: those strings are UTF-8 encoded! And there is an easy way to check that: let’s paste the byte sequence from the highlighted message (0xD0, 0x9E, 0xD0, 0xB1, 0xD0, 0xBD, 0xD0, 0xBE, 0xD0, 0xB2, 0xD0, 0xBB, 0xD0, 0xB5, 0xD0, 0xBD, 0xD0, 0xB8, 0xD0,0xB5) into any online UTF-8 decoder or ask Python to do it, and we should end up with Обновление. Its clearly Russian!
After spending some time labeling most of those strings I’ve observed that the order of languages is not fixed. So how the application could know which variant to use? Personally, I would implement it something along the lines:
enum LanguageIds {
    LANG_ENGLISH,
    LANG_SPANISH,
    LANG_GERMAN,
    LANG_POLISH,
    // ...
    LANG_COUNT_
};

const char* i18n_msg_updating_fonts[LANG_COUNT_] = {
    "Updating fonts",
    "Actualizando fuentes",
    "Schriftarten update",
    "Aktualizowanie czcionki",
    // ...
};
Yep, we’ve added another layer of indirection. This way we do not rely on the order of strings in the executable – the enumerations are fixed and therefore used to index the string tables. If the same index represents the same language across all tables, then we can store the index as the currently set language – simple, clean and efficient.
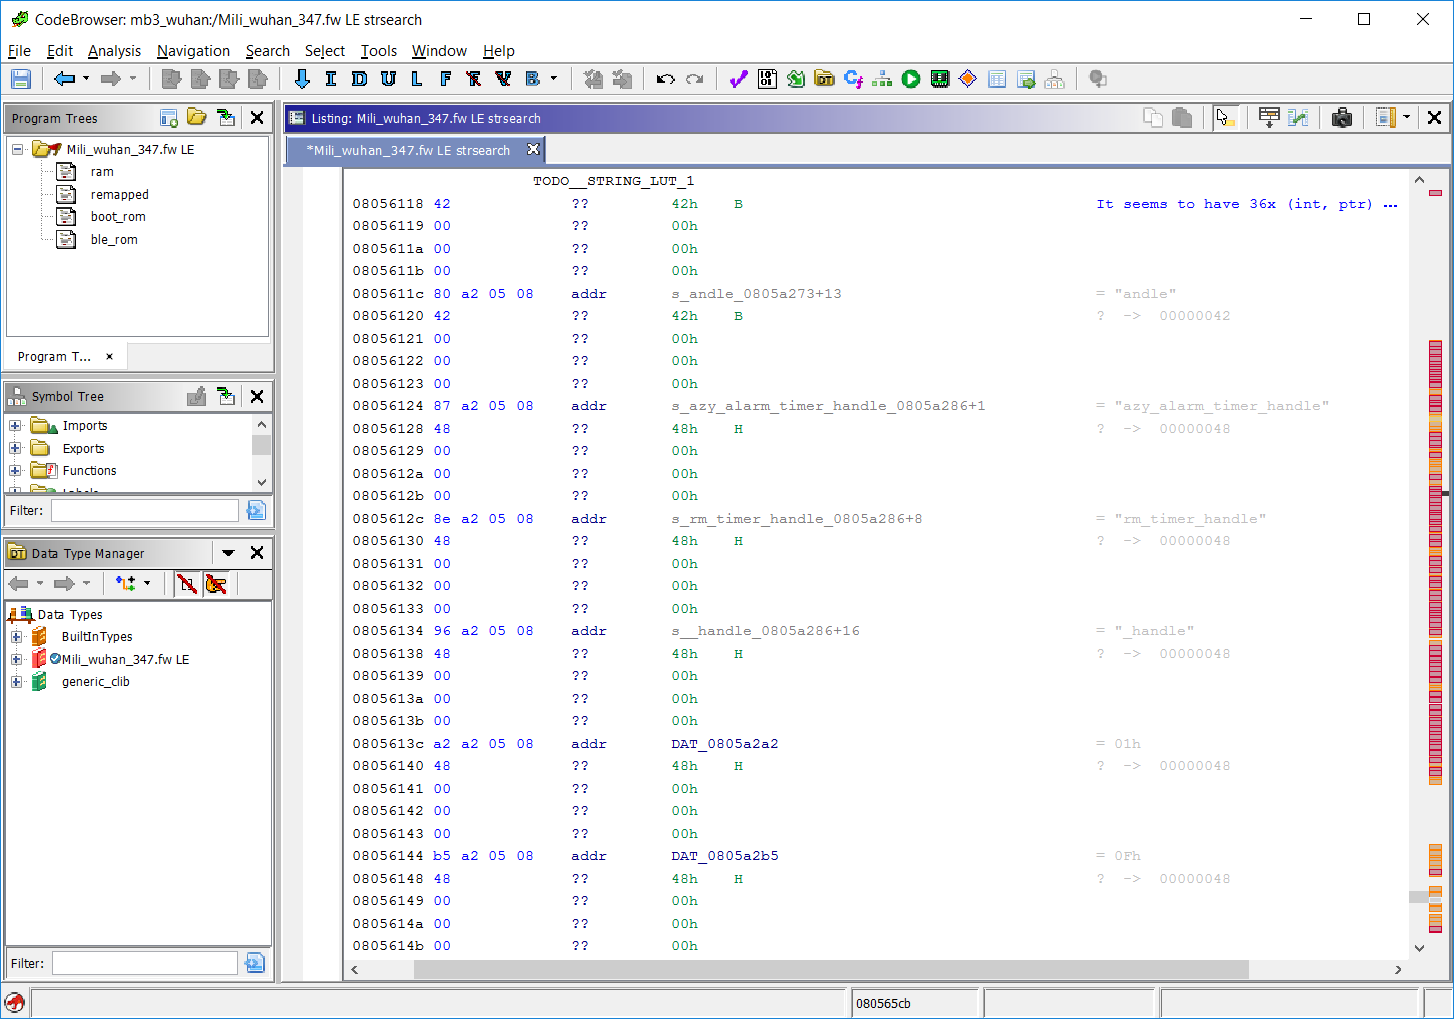
You bet! But what’s that? It seems to have a very regular structure and appears between groups of strings. Could it be…?
struct LocalizedStringEntry {
    uint32_t unknown_integer;
    const char *message;
};
Yep, it’s a string lookup table! I know that my label gave it away… We can clearly see that the offsets are off as they point to random locations within those strings. So it’s confirmed – we are still working with wrong Base Address, duh… 😞 But hold a minute – at this very time I’ve had an enlightening moment: we know the location of those tables and the addresses of individual strings so we can try…
Brute-forcing our way out
We can derive the base address ourselves using this simple equation: memory_address = base_address + file_offset.
We will use a base_address that “works” with the highest number of strings – piece of cake!
The first step is to prepare a list of as many string and table addresses as possible. If you think that this is tedious, then you are absolutely right, but we could do a little better. Knowing that all strings are NUL terminated we just have to get the address of the first string and simply collect remaining ones!

So I’ve listed all those addresses in this funny format, but without listing the addresses itself! I’ve just described how to find those addresses instead. You then might ask “Why for? Do you have to over-engineer everything?” – well, those are valid questions. Here’s my answer: “I’d like to reuse it in case the offsets change again!” 😇
The format is easy to parse which was intentional as we don’t want to write down the grammar in order to build a feature-blown parser.
Obviously after each LANG_STRING FIND there’s a string that has to be matched, whereas after TABLE FIND there is a sequence of bytes (in hex) to match. Comments start with # and are ignored.
import struct

def find_in_file(bf, bytes):
    """Looks for `bytes` sequence in given binary file `bf`."""
    buf_size = 8 * len(bytes)
    initial_pos = bf.tell()
    while True:
        buf = bf.peek(buf_size)
        if buf == b'': break
        offset = buf.find(pattern)
        bf.seek(offset if offset >= 0 else buf_size-len(bytes), 1)
        if offset >= 0: return bf.tell()
    bf.seek(initial_pos, 0)
    return None

def load_table(fw, offset):
    pointers = []
    while True:
        buf = fw.peek(8)
        if len(buf) < 8: break
        fst, addr = struct.unpack("II", buf[:8])
        if fst < 1 or fst > 300: break
        if addr < 0x07F00000 or addr > 0x08100000: break
        fw.seek(8, 1)  # consume entry
        print(f"TABLE PTR {hex(addr)}")
        pointers.append(addr)
    return offset, list(sorted(pointers))

def load_strings(fw, offset):
    strings = []
    for lang in range(16):  # There are 16 languages
        start_offset = fw.tell()
        buf = b""
        while True:
            c = fw.read(1)
            buf += c
            if c == b'\0':
                break
        if len(buf) > 1:  # Skip empty (NUL) strings
            strings.append((start_offset, buf))
    return offset, strings

# Load firmware and "execute our script"
tables = []
all_strings = []
with open("./Mili_wuhan.fw", "rb") as fw:
    with open("./lang_strings.txt", "r") as script:
        for line_no, line in enumerate(script):
            line = line.strip()
            if not line or line.startswith('#'):
                continue  # Skip empty lines and comments
            elif line.startswith("TABLE FIND "):
                pattern = bytes.fromhex(line[11:])
                offset = find_in_file(fw, pattern)
                if not offset:
                    print(f"Could not find table from line {line_no+1}!")
                    print(f"  Current offset: +{hex(fw.tell())}")
                    continue
                tables.append(load_table(fw, offset))
            elif line.startswith("LANG_STRING FIND "):
                pattern = (line[17:].strip('"') + '\x00').encode('ascii')
                offset = find_in_file(fw, pattern)
                if not offset:
                    print(f"Could not find string from line {line_no+1}!")
                    print(f"  Current offset: +{hex(fw.tell())}")
                    continue
                all_strings.append(load_strings(fw, offset))
            else:
                print(f"ERROR: Line {line_no+1} has unknown format: {line}")
                continue

# Flatten both lists
flat_pointers = []
for _, pointers in tables:
    flat_pointers.extend(pointers)
flat_strings = []
for _, variants in all_strings:
    for offset, _ in variants:
        flat_strings.append(offset)

all_hits = []
#for base in range(0x07FC0000, 0x08050000):
for base in range(0x08000000, 0x08006000):
    num_hits = 0
    for offset in flat_strings:
        if base + offset in flat_pointers:
            num_hits += 1
    all_hits.append( (num_hits, base) )

# Display the results
for hits, base in sorted(all_hits):
    print(f"{hex(base)} had {hits} out of {len(flat_pointers)} matches!\tcoverage = {100.0 * hits / len(flat_pointers)}%")
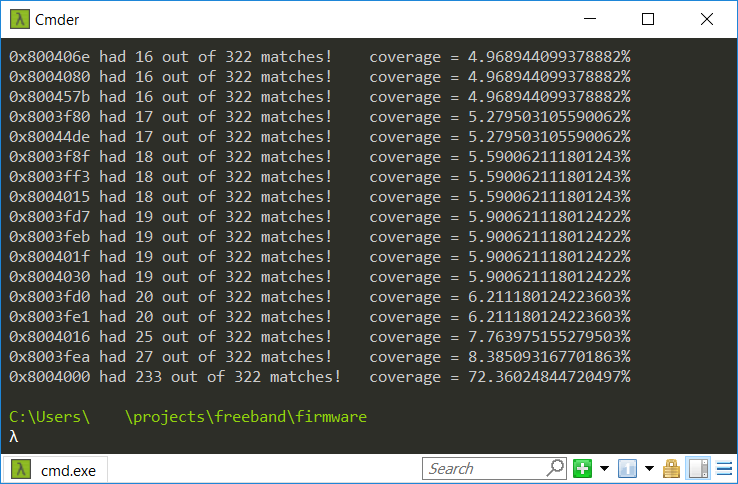
Above’s script tries every base address within a given range counting the number of matched addresses and finally displays them in ascending fashion. Guess what! There was only one address that covered more than half of the strings. Just to double-check that, I’ve run it on a much more broader range giving the same result.
So we did it! We’ve found our base address – it’s 0x08004000! Once I’ve reimported the firmware to Ghidra using this address, we can enjoy the fact that “Reset” handler points to the very beginning of a function – our entry point.
Victory!
Summary
I guess I’ll end this post right here. TBH I haven’t expected it to be that long… In this post, we get a brief overview of the boot process and we learned that there are 16 different languages that use UTF-8 encoded strings. What’s more important – we’ve managed to “exploit” the strings to get the base address of the firmware image. Maybe this wasn’t the most elegant way to find it, but who cares! Sometimes the hard way pays off 😜